


Ro Ghoul Hack Roblox
4 years ago
What is the content you’ll be using in your lesson?
The content that I will be using for my lesson is found in the Utah state core curriculum for 4th grade. It is under Standard 3, Objective 1, c which states "Sort rocks by appearance according to the three basic types: sedimentary, igneous and metamorphic (e.g., sedimentary–rounded-appearing mineral and rock particles that are cemented together, often in layers; igneous–with or without observable crystals that are not in layers or with or without air holes or glasslike; metamorphic –crystals/minerals, often in layers)." As a freshman in elementary education I took a physical science class where we had to memorize 40 sedimentary, igneous, and metamorphic rocks. I do not remember learning these when I was in elementary school, and it was difficult for me to do well with the rocks. I believe this lesson will make it more meaningful and memorable to young fourth graders.
What is the pedagogy you’ll be using and why is it a good fit with the content?
I am using good pedagogy by selecting content, classifying rocks, that is normally hard to understand and unclear why it is important to learn. This lesson plan is very engaging and exciting, and I know students will have fun learning about rocks. The students will not be bored learning about rocks, which is normally not a favorite subject. Making science fun is always a plus, and a skill teachers need to aquire. I made a lesson plan that includes very up to date technology which is what students will need to know how to do. I know my students will be on computers even more than I am now, when they are in college and in a profession. My students need to be computer savvy and know how to do many computer programs.
What is the technology you’ll be using and why is it a good fit with the content and pedagogy?
The technology I will be using for this lesson is Google Earth. This program is a perfect fit for the content to enable students to see real examples of each type of rock, on the earth. Students can see what it is like in every country, and recognize the similarities between them. Google Earth allows me to zoom in on any country, city, or landmark, and also see what it would look like from a "street view." There is no other tool that allows you to look at locations all across the globe with such precision and detail. This technology is great for my pedagogy because this program lets kids explore individually. Each student works at a different pace, therefore it is helpful for them to explore and learn on their own. Google Earth is great for many reasons, and it can also allow students to easily find locations they need, and become aware of additional information concerning a location, or country.
Hooray for Google Earth!
| Location | Activity | Picture |
| 1. Japan, Hokkaido, Mount Rausu (igneous) | Briefly introduce the rock cycle and explain that they will see places where all 3 parts occur. Have students reach the location on GoogleEarth. Ask the students what type of rock is formed at the volcano they see at Mount Rausu; discuss what happens in forming igneous rocks. Then have them watch the igneous rock video at
|  |
| 2. Grand Canyon, Arizona(sedimentary) | Have students reach the location on GoogleEarth. Teacher will explain process of forming sedimentary rocks. Have them watch the sedimentary rock video at
|  |
| 3. Manualoa, Hawaii (metamorphic) | Have students reach the location on GoogleEarth. Teacher will explain process of forming metamorphic rocks. Have them watch the metamorphic rock video at
|  |
| 4. Karnataka, India (sedimentary) | Have students reach the location on GoogleEarth. Have students explore this area using the zoom features and others available to identify at least one type of rock in the area. Once students identified one rock formation have students explore other locations and the rocks there. |  |
| Details of image overlay / path / polygon: | In our Google tour we used the Geographic web features of Panoramio. We also used the terrain feature, and labels so the students would know what they were actually looking at. Our tour began at Mount Rausu, Japan, it then went to the Grand Canyon, Arizona, next it went to Manualoa, Hawaii, and finally to Karnataka, India. The path shows the travel route to each location, visually. |
SOURCES:
Igneous Rock Formation:
http://www.outreach.canterbury.ac.nz/resources/geology/glossary/igneous.jpg
Three Types of Rock Formation:
http://i.ehow.com/images/GlobalPhoto/Articles/2281951/RockCycle-main_Full.jpg
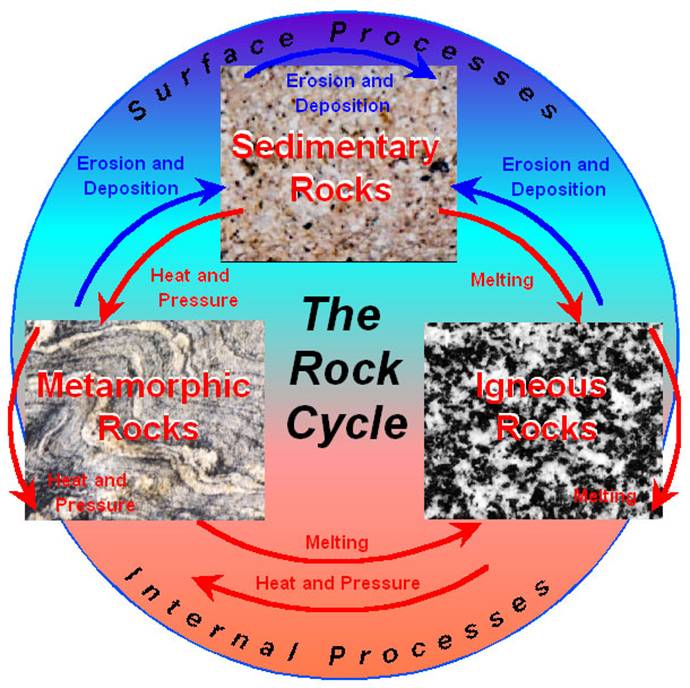
The Rock Cycle:
http://web.ics.purdue.edu/~braile/edumod/pebble/pebbleAM_files/image007.jpg
Sedimentary Rock Formation:
http://www.energyinst.org.uk/education/glossary/images/sediment.gif
Metamorphic Rock Formation:
http://www.bbc.co.uk/schools/ks3bitesize/science/images/sci_dia_33.gif
Metamorphic Rocks:
http://honolulu.hawaii.edu/distance/geolab/R*M/metrx.jpg
Igneous Rocks:
http://honolulu.hawaii.edu/distance/geolab/R*M/metrx.jpg
Sedimentary Rocks:
http://honolulu.hawaii.edu/distance/geolab/R*M/sedrx.jpg
What is the content you’ll be using in your lesson?
The content we will be using in our lesson is from the Utah State Core Curriculum, Standard 8, Objective 6. This includes having students write to communicate effectively for different audiences and purposes. Objective 6 states "write in different forms and genres," and letter a states "Produce personal writing." Examples of these are writing journals, friendly notes and letters, or family stories. This is what we are focusing on for our lesson. We are using pictures from a self-produced and self-illustrated book. The book is titled Over the River and Through the Wood.
What is the pedagogy you’ll be using and why is it a good fit with the content?
Through selecting a writing project that students in my class might work on I am using good pedagogy. We are making a digital storytelling project that uses the genre of family stories. In this lesson we will use our story as an example of a family story, and ask them if they have any fun stories from their own family. This could also be used as an example of an adventure story as well. I could ask the students to predict the outcome, and use clues to guess the ending. After giving this example to the students I can have them create their own stories many different possible genres.
What is the technology you’ll be using and why is it a good fit with the content and pedagogy?
The technology we will be using is the paper and pencil storyboard template. This technology helps me break down the digital storytelling and organize what to say with every picture. This is a great tool to organize the digital storytelling, just as an outline to a paper organizes your thoughts. Another technology tool I will be using is iMovie. This will help me combine images, music, and narration to create the complete digital storytelling experience. The technology of iMovie lets me add my own voice to certain pictures, and we can narrate a story as the students watch the screen. It is also possible to publish these movies on TeacherTube and let others see the finished work. This would be easy for the students to use as they can be excited about creating their own movie.
I have been recruited by my district to contribute an article to the monthly newsletter concerning technology in the elementary science classroom. The column I am writing is entitled “The Tech Savvy Teacher. “ My newsletters will provide examples of how different technologies are used for specific science concepts. I look forward to exploring these programs as well as implementing them in the classroom.
The first science activity we did was based on this objective in the second grade core curriculum. It is standard three, which says, “Students will develop an understanding of their environment.” The objective is number one and it says, “Investigate relationships between plants and animals and how living things change during their lives. The objective is 1b, which says, “Describe the life cycle of local plants and animals using diagrams and pictures.” For this objective we used the program Kidspiration and used this technology to enhance our lesson. We went into the science section of the program and selected the life cycles option.
In this application we searched plants and a variety of species appeared. We began with the birth of a plant and typed in seed. Pictures of seeds appeared and we placed it in the concept map. Then we added words that related to the beginning of a plant such as water and soil. We could use words or pictures to represent these items. The students can choose whichever option they prefer. We did this same process for the other steps of the life cycle.
The writing guide is another tool we used for this project. We wanted to know what other words related to reproduction. When we typed in reproduction a series of definitions came up and synonyms along with them. We learned that a similar word to reproduction is breed. We then used that word in our concept map and continued with our learning. After we completed the concept map with pictures and words we went to the writing view. There was an icon for every picture and word with writing space for explanation and expansion. This is a great tool to help kids connect their learning with their writing.


 Life Cycle Page